Best Practices Newsletter
SEPTEMBER 2024
Tip #20: Check out our new protocol for organoids.
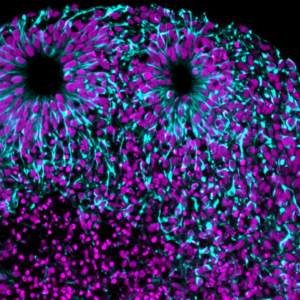
We are adding more application-specific protocols to our wiki. Our newest protocol is optimized for preparing organoids for light sheet imaging. This protocol is similar to our previous “Small Sample Protocols” but it’s simplified and shortened to work best with organoids of various sizes. Read the details on the organoid protocol.
Tip #21: Use UV light to find refractive-index matched organoids more easily.
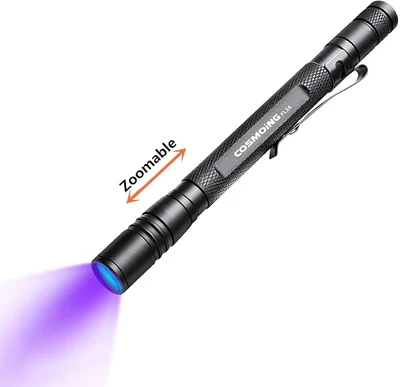
Organoids can range in size from less than the width of a hair to five millimeters depending on the type of organoid and the stage of development. After refractive index matching, organoids become optically clear and can be very difficult to see in solution. If you are unable to find an organoid after refractive index matching, a small UV pen light like this one can help you spot them more easily.
AUGUST 2024
Tip #19: Check out our labeling examples in the 3D viewer
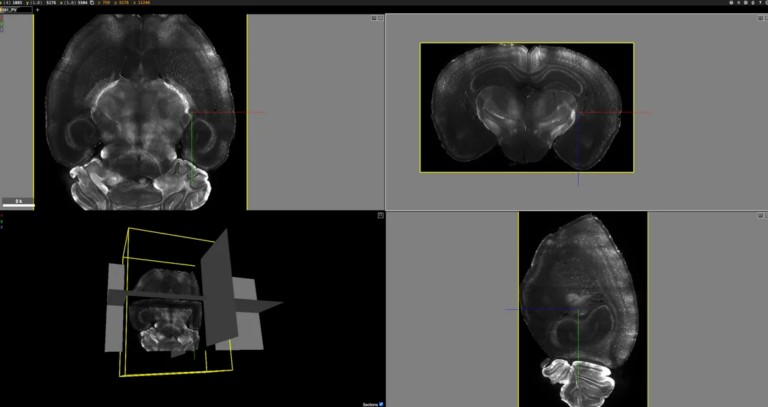
Before you start a tissue clearing and labeling experiment, it’s helpful to get a sense for the expression pattern of your target to know if the labeling worked well. 3D visualization can give you a quick sense for cell location, density, projections and more. We are giving users the ability to see 3D images of cleared brains labeled with our validated antibodies using Neuroglancer, a web-based viewer for volumetric data. Here’s a four minute tutorial from the Princeton Neuroscience Institute that will give you a quick overview of the viewing windows and controls in Neuroglancer before going to the wiki page with the labeling examples.
JULY 2024
Tip #17: Use tissue imaging to check for discrepancies between transgenic and immunohistochemical labeling.
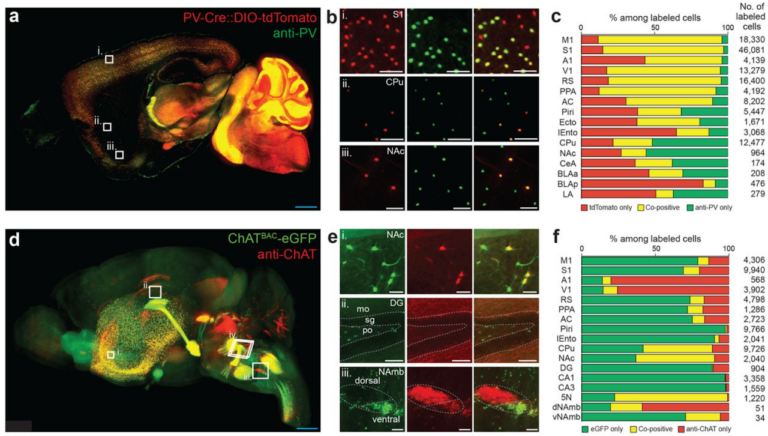
Brain-wide comparison of genetic cell-type labeling and SmartBatch+-driven protein-based cell type labeling. (a-b) 3D dataset and percentage plot from a PV-Cre and DIO-tdTomato dual transgenic mouse hemisphere stained with anti-PV antibody. (d-f) Same for ChATBAC-eGFP mouse brain stained with anti-ChAT antibody. doi: https://doi.org/10.1101/660373
Fluorescent proteins have different brightnesses. For example, mCherry and tdTomato are two fluorescent proteins that can be used in the 561/xxx nm ex/em (red) channel. tdTomato has a relative brightness of ~95 whereas mCherry has a relative brightness of ~16, when you take the product of their extinction coefficient and quantum yield. In addition, tdTomato is excited at ~91% of its maxima at 561 nm compared to mCherry which is excited at ~61% of its maxima at 561 nm. If tdTomato and mCherry are in equal abundance, tdTomato would be 8-9 times brighter than mCherry. mCherry is generally very dim for lightsheet imaging with SmartSPIM or MegaSPIM, especially if you would like to see neurites. Therefore, if you have to use mCherry, you can boost the mCherry signal by immunolabeling the fluorescent protein with an antibody conjugated to a 561 nm fluorescent dye.
Tip #18: Label nuclei to facilitate atlas registration.
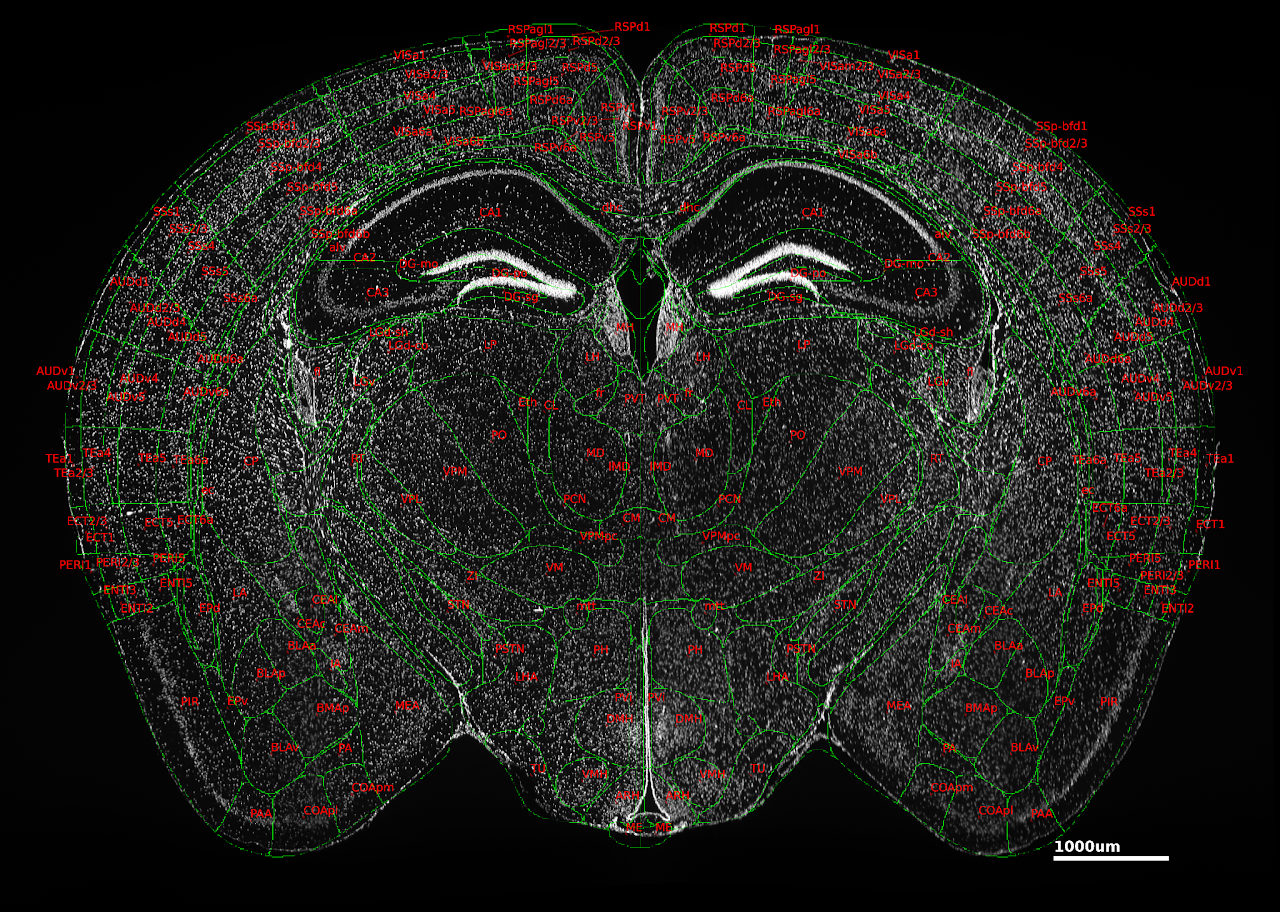
Nuclear labels are useful to implement in tissue clearing experiments because they highlight structural details that can be used to facilitate atlas registration. Nuclei can be labeled with fluorescent dyes which bind to DNA or by immunodetection of a nuclear protein. Both dyes and antibodies should be validated in your tissue clearing workflow. The dyes and antibody we recommend for samples that have been processed with SHIELD include:
Dyes:
- 445 – Popro
- 488 – Yopro1, Syto16
- 561 – Propidium Iodide
- 647 – NucSpot 690/700
Antibody:
- NeuN (brain)
JUNE 2024
Tip #15: When your target is highly abundant, try Radiant primary labeling, to overcome challenges getting uniform labeling.
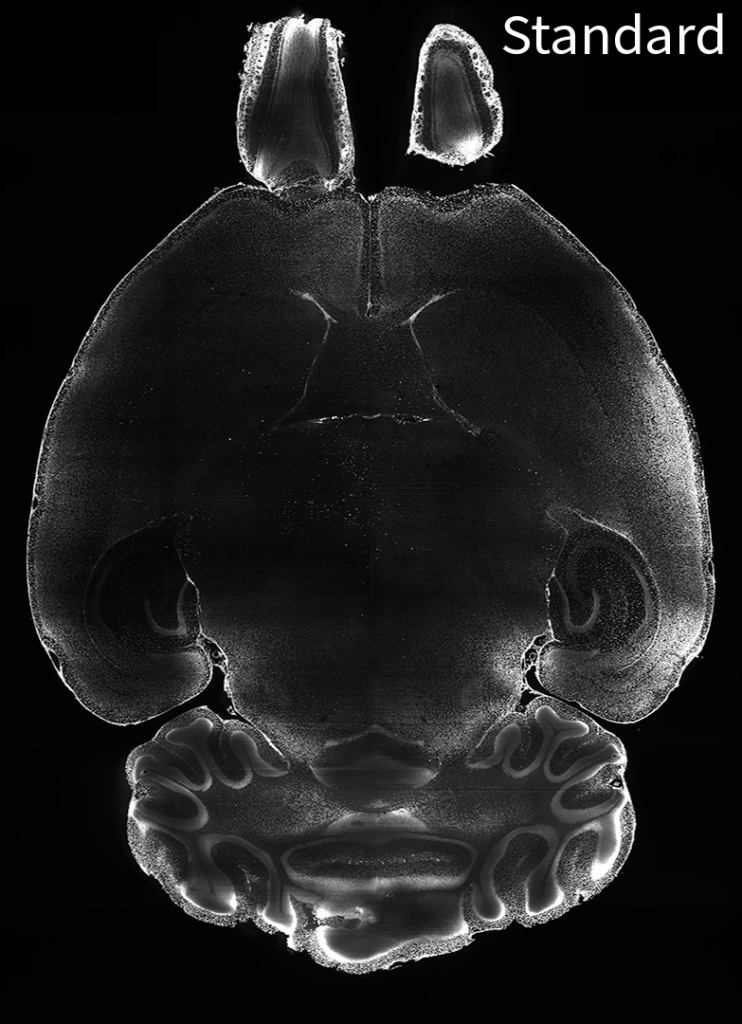
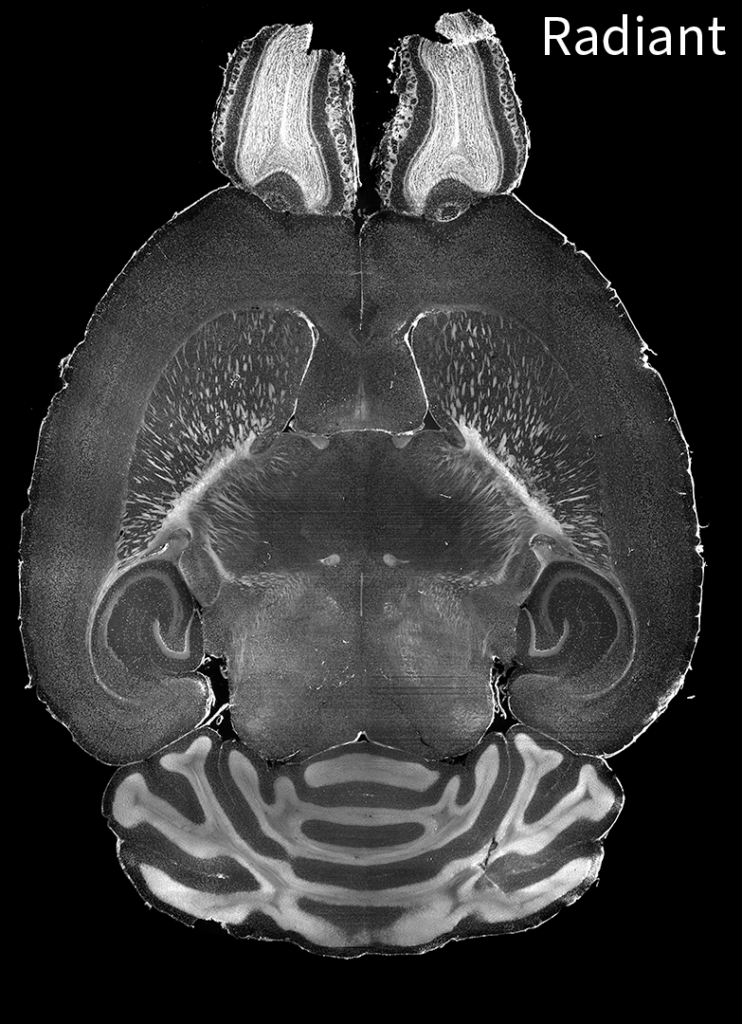
Horizontal image of mouse brain labeled with an anti-lamin B1 antibody using the standard protocol (left) and the Radiant protocol (right).
When targets are very abundant, like Lamin B1 in the brain for example, the initial buffer conditions which are meant to suppress antibody binding combined with the electrocatalytic affinity sweep used by SmartBatch+ are not sufficient to prevent surface binding and antibody depletion (left image). Therefore to overcome the challenges associated with labeling very abundant targets, the SmartBatch+ Radiant upgrade was invented to suppress antibody binding to an even greater extent in the initial buffer conditions and provide more time for the antibody to penetrate and disperse throughout the tissue resulting in more uniform labeling
Tip #16: Choose a bright fluorescent protein for lightsheet imaging.
Fluorescent proteins have different brightnesses. For example, mCherry and tdTomato are two fluorescent proteins that can be used in the 561/xxx nm ex/em (red) channel. tdTomato has a relative brightness of ~95 whereas mCherry has a relative brightness of ~16, when you take the product of their extinction coefficient and quantum yield. In addition, tdTomato is excited at ~91% of its maxima at 561 nm compared to mCherry which is excited at ~61% of its maxima at 561 nm. If tdTomato and mCherry are in equal abundance, tdTomato would be 8-9 times brighter than mCherry. mCherry is generally very dim for lightsheet imaging with SmartSPIM or MegaSPIM, especially if you would like to see neurites. Therefore, if you have to use mCherry, you can boost the mCherry signal by immunolabeling the fluorescent protein with an antibody conjugated to a 561 nm fluorescent dye.
MAY 2024
Tip #13: When cutting soft tissues, section with high blade vibration amplitude and feed your sample slowly.
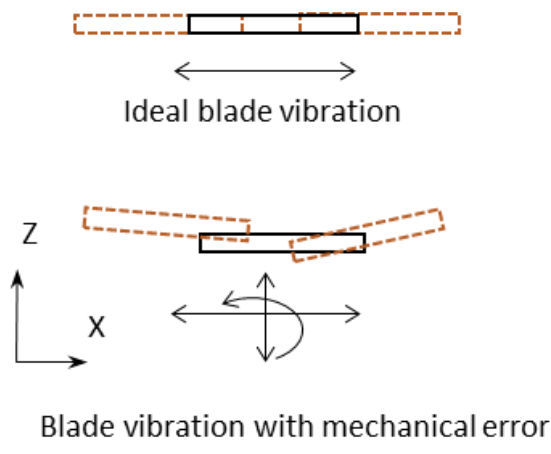
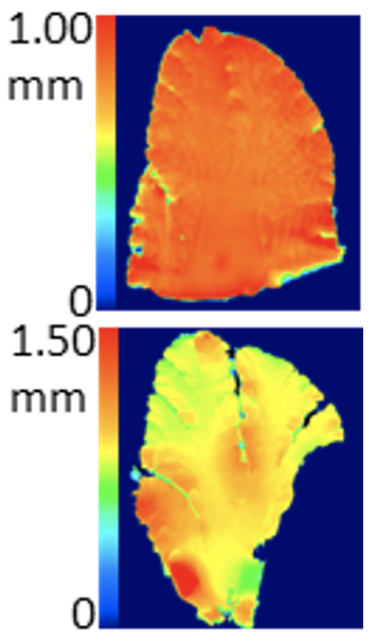
(Left) Ideal blade vibration with no vertical displacement error (top) and blade vibration showing vertical displacement error (bottom). (Right) Slices scanned with an optical profiler showing great surface evenness (top) when there is minimal vertical displacement error compared to the highly uneven tissue section (bottom) when there is vertical displacement error. (https://doi.org/10.1101/2022.03.13.484171)
Vibrating microtomes are designed to handle soft tissues such as fresh tissues, PFA-fixed tissues, cleared tissues, expanded tissues, etc. Since soft tissues can be damaged and deformed easily, it’s extremely important to choose the right parameters to generate high quality tissue sections. Generally,
- High blade vibration speed is beneficial for generating a smooth cut. Always choose a medium to high blade vibration amplitude. If the vibrating microtome device introduces too much “up and down” agitation, a high blade vibration can section soft tissues imprecisely.
- Feeding your samples slowly is always preferred for getting the best quality sections. However, efficiency matters! To increase your sectioning speed, embed your samples in agarose or gelatin securely and set the highest vibration amplitude.
Tip #14: Take advantage of Megatome’s large sample capacity to improve your tissue sectioning throughput when many samples need to be processed.
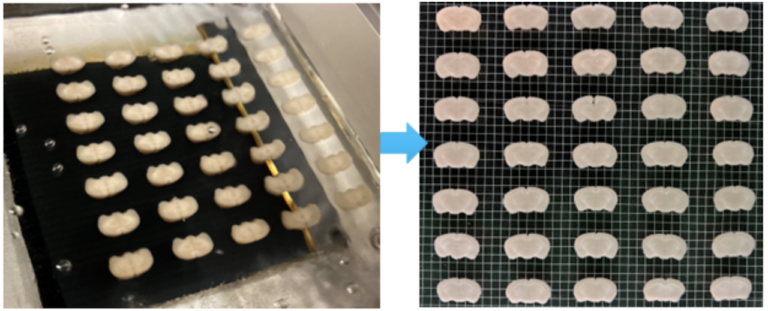
A mouse brain array embedded in agarose and sectioned in parallel with Megatome.
Tissue sectioning can be a laborious and time-consuming process, especially when you have a large number of samples. The large capacity of the Megatome allows multiple samples to be sectioned together after embedding them in an array using a sample array kit.
APRIL 2024
Tip #11: For antibodies that have not been validated for whole tissue imaging, first determine if your antibody can bind to its target.
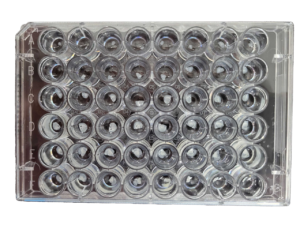
Tissue sections are typically fixed with a cross-linking agent (e.g., PFA) and permeabilized with a detergent (e.g., Triton X-100). However for whole tissues, samples are fixed with PFA and SHIELD and permeabilized with Delipidation Buffer. The use of a different cross-linking agent and detergent means that antibodies need to be validated. The first step is to determine if the antibody can bind to its target using sections from whole tissues that have been prepared with PFA, SHIELD, and Delipidation Buffer. Testing on sections conserves antibodies.
Tip #12: For antibodies that have not been validated for tissue imaging, second determine if your antibody can penetrate and label the tissue evenly.
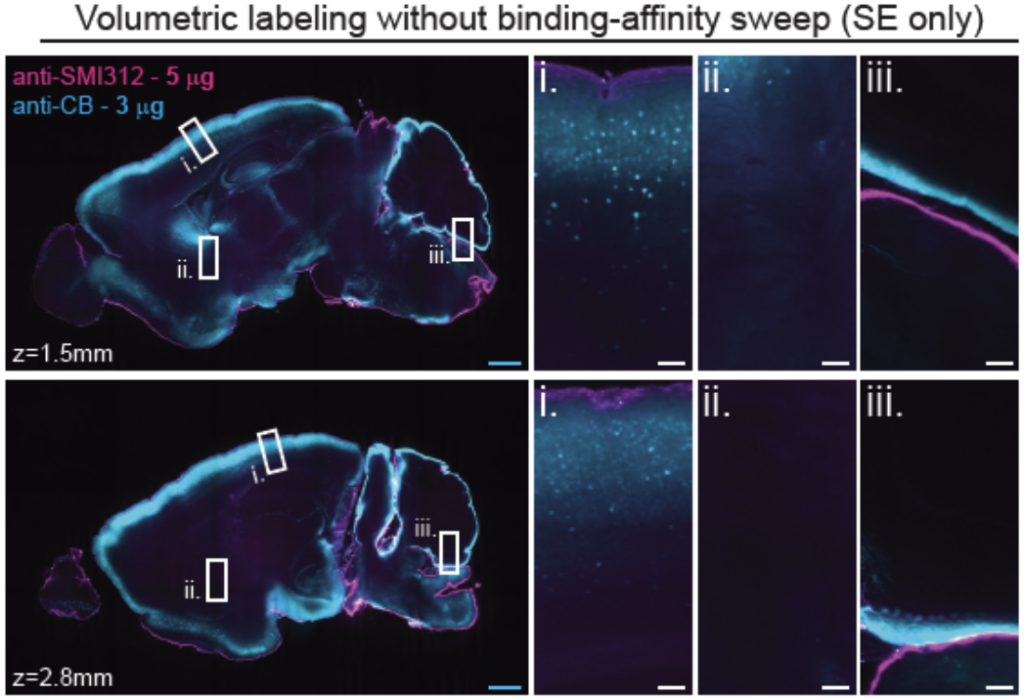
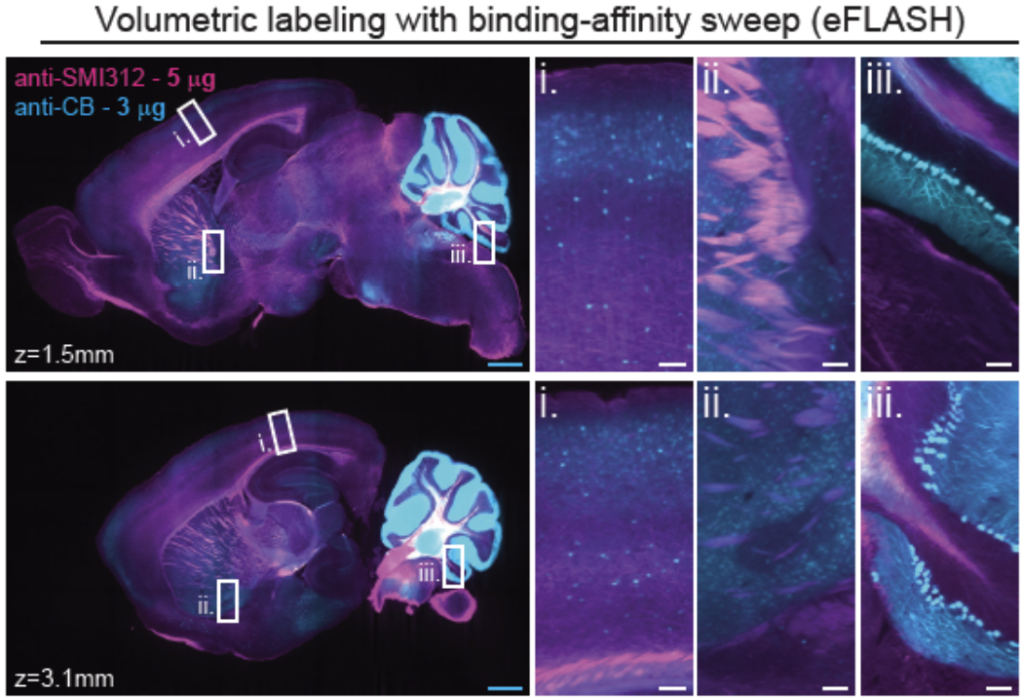
Comparison of antibody penetration and uniformity of staining between electrophoresis only (SE only) and electrophoresis combined with binding-affinity sweep (eFLASH). Optical sections of mouse hemispheres at different depths are shown (white boxes). Image from Yun et al.
To get complete labeling of whole tissues, the antibody has to penetrate the tissue deeply and evenly. Incubating tissues with antibody solution is rate limited by diffusion. In addition, when the target is abundant, the antibody can get depleted at the surface resulting in a labeling gradient. When this occurs, a SmartBatch+ implementing eFLASH can be used to circumvent these issues.
MARCH 2024
Tip #8: Use bright photostable dyes when imaging large tissues.
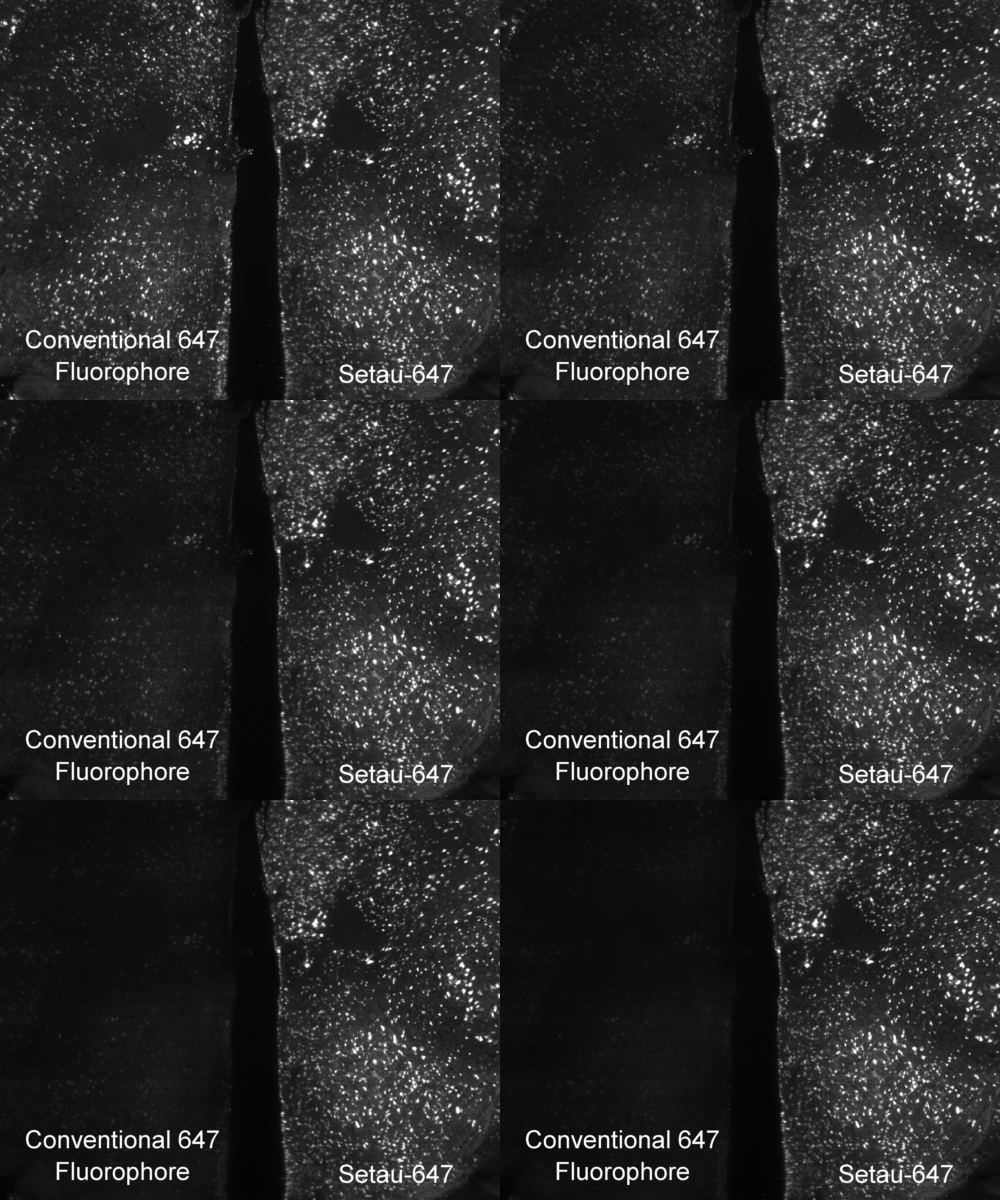
Mouse brain labeled with a conventional 647 fluorophore (left) and SeTau-647 (right) under constant exposure from a 647 nm laser on a SmartSPIM microscope. The time-course is shown below in the new products section.
Photobleaching is a photochemical alteration of a fluorophore (dye conjugate, fluorescent protein) such that it is permanently unable to fluoresce. It is important to choose bright stable fluorophores when imaging large tissues because photobleaching during image acquisition can deteriorate the quality of the image or make the image unanalyzable. When fluorophores are bright, you can lower the laser illumination power to reduce photobleaching and when fluorophores are photostable they can last during lengthy acquisition times.
Tip #9: Image in the far-red channel to reduce tissue autofluorescence.
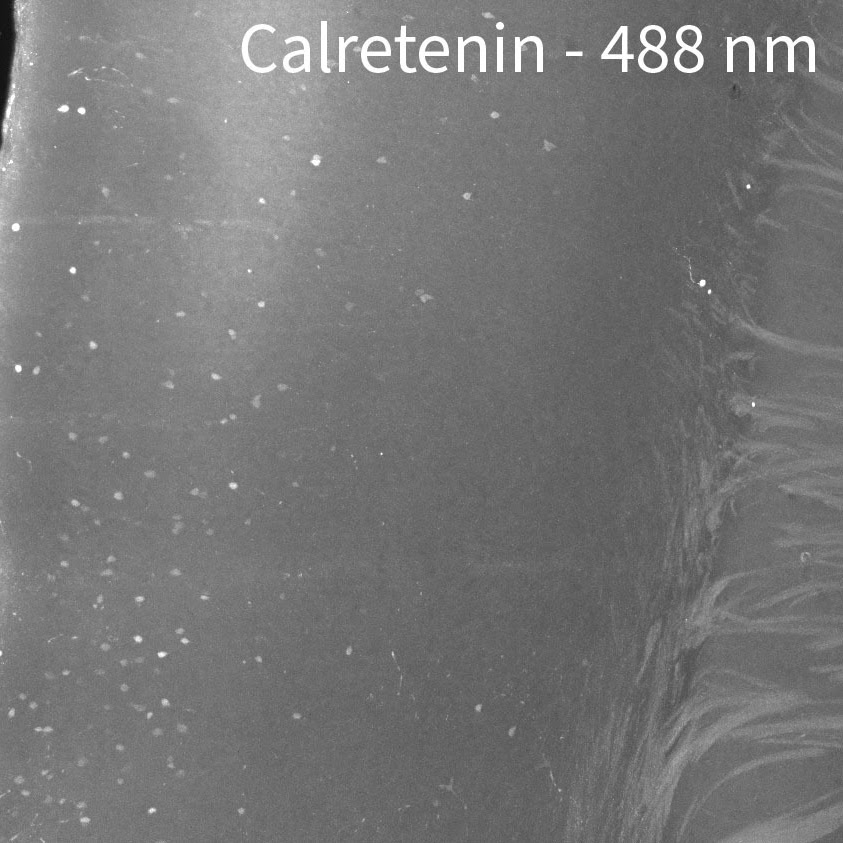
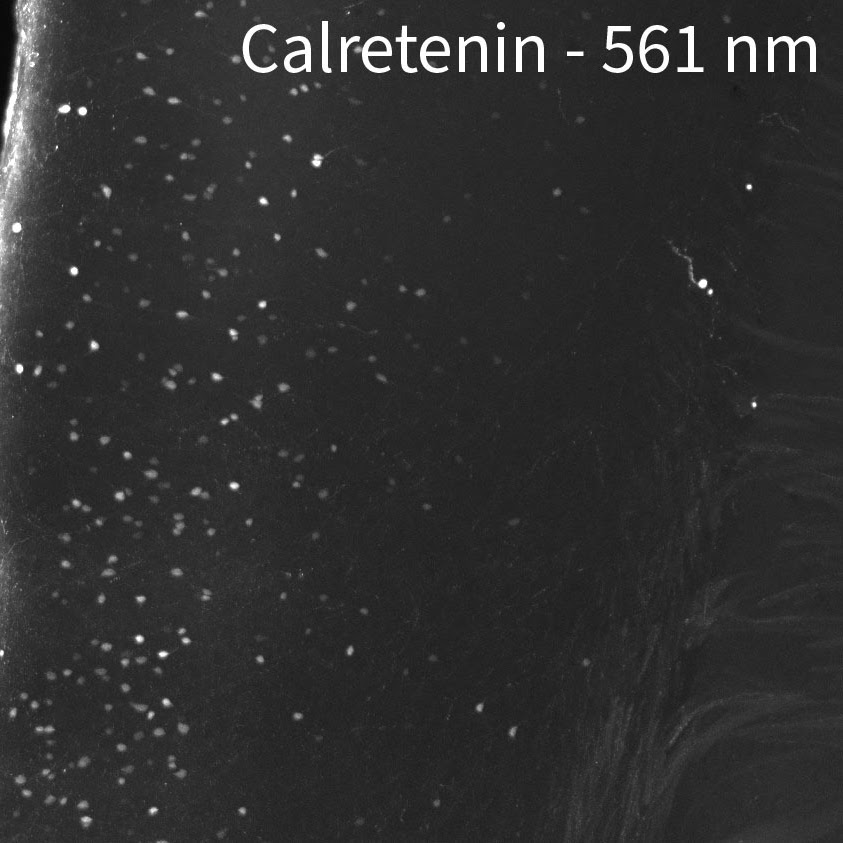
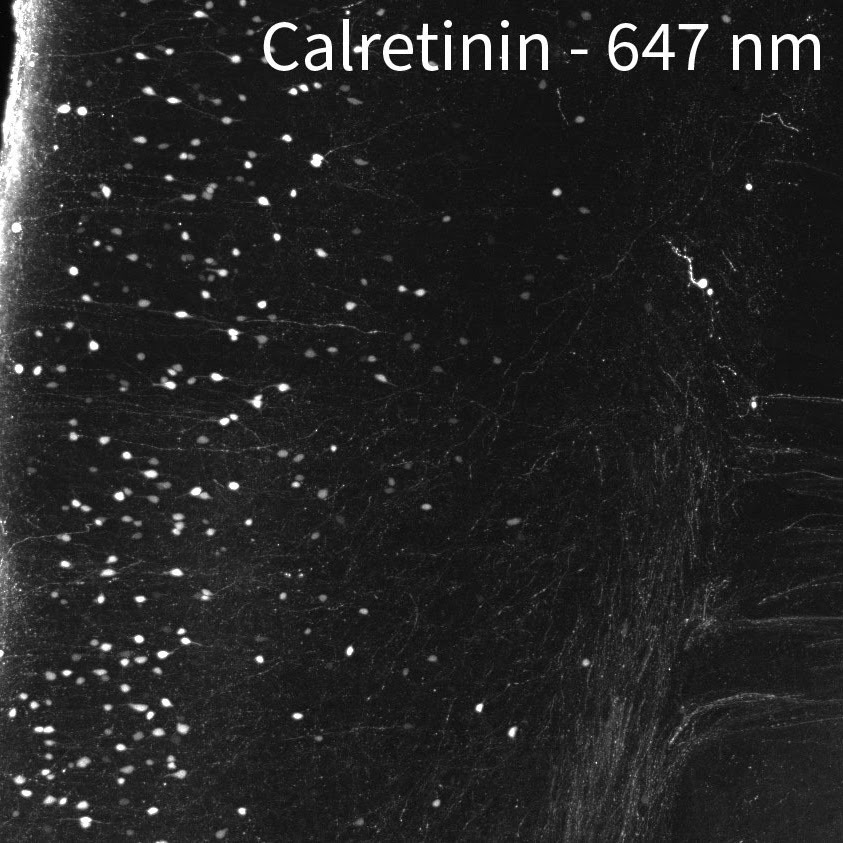
Mouse brain labeled with a rabbit anti-calretinin antibody and anti-rabbit secondary antibodies conjugated to 488 nm, 561 nm, and 647 nm fluorescent dyes.
Tissue autofluorescence can come from external sources such as tissue preparation and includes fixation and subsequent treatments. During aldehyde fixation for example, amines combine with aldehydes to form complexes known as Schiff bases which are fluorescent near the blue end of the spectrum. Use the blue channel for targets that you can get strong signals from in order to use reduced laser power and minimize autofluorescence. Reserve the far red channel for dimmer signals from important targets that could benefit from improved signal-to-noise by having less tissue autofluorescence. If you have the option to choose any channel for immunolabeling, the 647 nm channel is the best for tissue imaging, followed by 561 nm due to the lower autofluorescence at these wavelengths. We have also indicated on our Validated Antibody List when some antibodies should be imaged at certain wavelengths because of their brightness relative to the background.
Tip #10: Perfuse your animals well to minimize autofluorescence from endogenous sources.
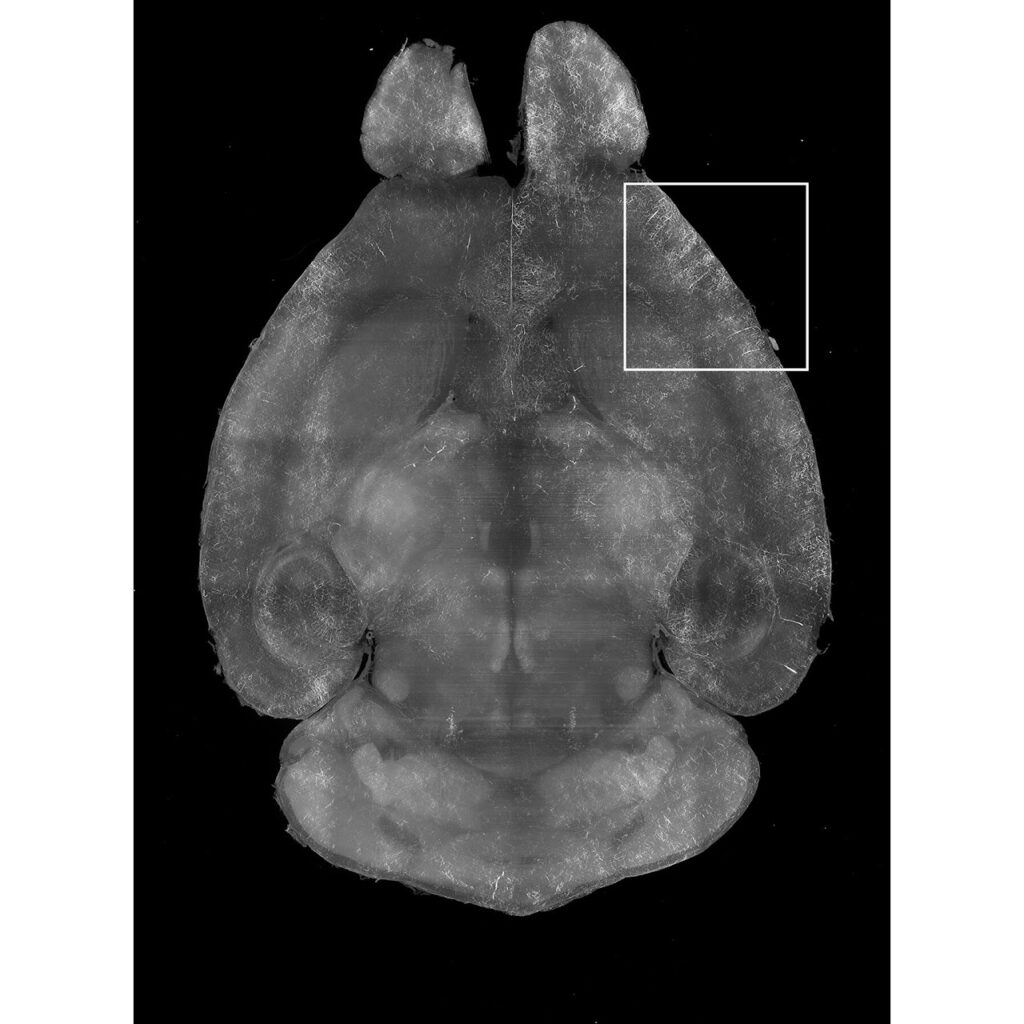
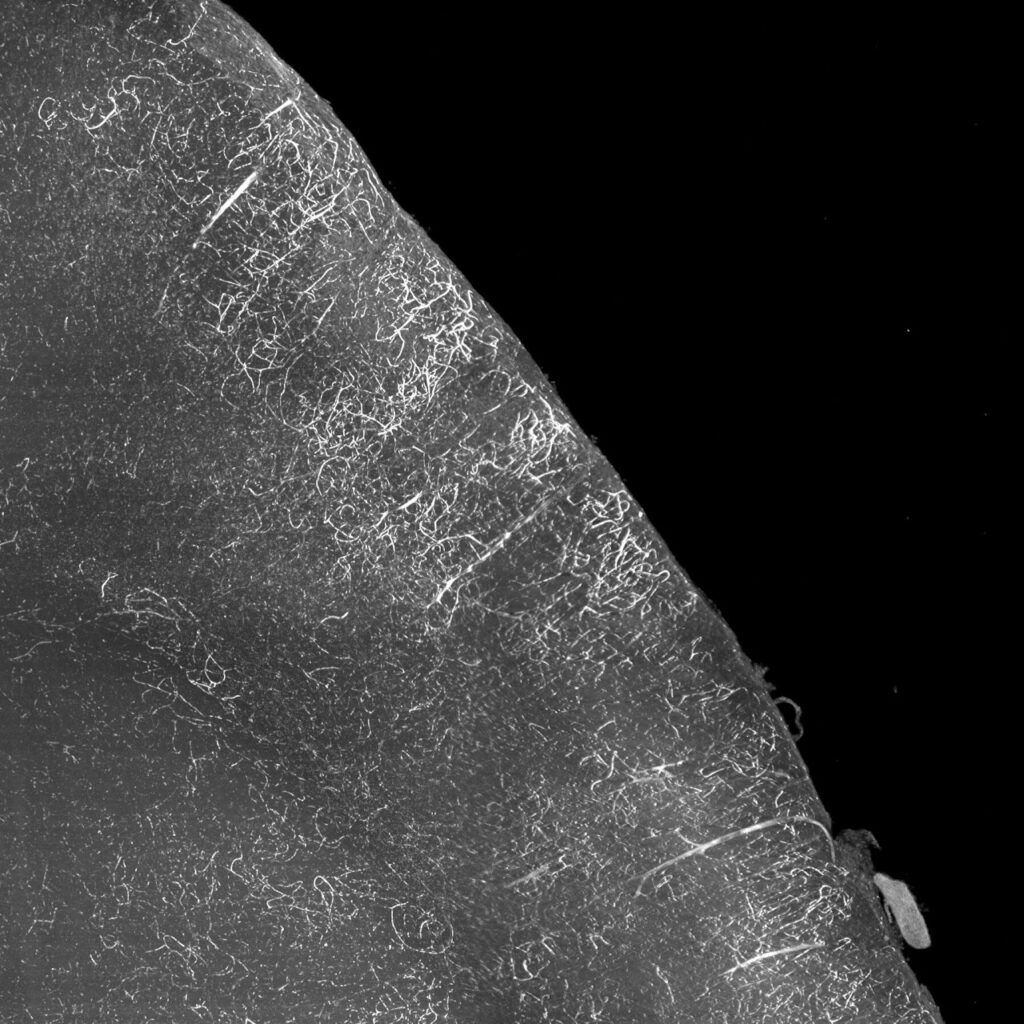
500 µm maximum intensity projection from a mouse brain imaged in the 488 channel. The vasculature, which is more defined in the magnified region (white box), displays autofluorescence as a result of poor perfusion.
The vasculature is filled with red blood cells, which contains hemoglobin that is autofluorescent at many wavelengths. When animals are poorly perfused the remaining blood can be problematic for light sheet fluorescence microscopy because the nonspecific autofluorescent signals can mask or interfere with the experimental fluorescent signals of a specifically labeled protein or genetically-expressed fluorescent protein deep within tissues.
FEBRUARY 2024
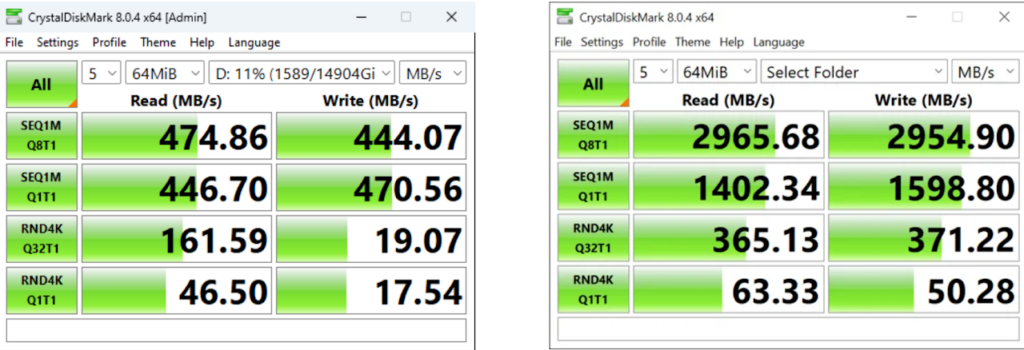
Tip #6: Determine how fast your storage drive can transfer data to minimize bottlenecks.
Data transfer can be a very significant bottleneck when handling large volumes of imaging data. We recommend measuring how fast your storage device is to determine if data transfer speed is causing very lengthy transfer times. Open source disk drive benchmarking tools (e.g., CrystalDiskMark) can be used for testing the performance of storage drives. It can report sequential and random read and write speeds with varying numbers of queues and threads. Shown below are the read and write speeds for transferring 64MB data using a Local Hard Disk Drive (two drives striped) (left) and a networked Solid State Drive server (right).
Tip #7: Choose the right data storage solution for volumetric imaging data handing.
The exceptional amount of data that light sheet imaging provides can be effectively managed by:
- Using high-performance storage servers to minimize transfer times and to smoothly work with the data. All-flash storage servers are well-suited to this task.
- Leveraging high-speed (at least 10 gigabit) networking to have data instantly accessible across the lab.
- Have a back-up strategy in place, preferably off-site. LTO Tape and HDD storage devices are cost effective options.
JANUARY 2024
Tip #3: Go to our new wiki to get up-to-date protocols and resources.
LifeCanvas has a new wiki for everyone to freely access our protocols and resources with additional details to address frequently asked questions about the workflow. The formatting of our protocols has been improved to make search and navigation quick and easy on any device. An important change is the addition of a blocking step before the primary labeling step with our new blocking solution. We will be updating the LifeCanvas wiki regularly so you can get the latest protocol updates and we will be communicating these changes through the User Newsletter and the wiki’s change-log.
Tip #4: Get helpful starting points with our updated validated antibody list.
We updated our SmartBatch+ and SmartLabel Validated Antibody List with new antibodies and contrast reagents with recommended starting amounts based on staining cup size for common tags and markers including Myc, RFP, HA, and Yopro-1. Supplier and catalog number included. Is there an antibody to a common tag or cellular marker that you would like to see validated for our tissue processing workflow? Let us know at support@lifecanvastech.com.
DECEMBER 2023

Tip #1: We highly recommend using EasyIndex Matched Immersion Oil instead of EasyIndex to fill your imaging chamber when imaging samples that have been index matched with EasyIndex. Water at the surface of EasyIndex in the imaging chamber evaporates producing wave-like changes in refractive index at the surface in a matter of minutes, which can negatively impact imaging quality. By using EasyIndex Matched Immersion Oil instead of EasyIndex in your imaging chamber, it will be cheaper, it will last longer, there will be no evaporation, and you will not need to remove bubbles from the objective lens between sample changes.
Tip #2: The SHIELD Epoxy storage condition has been changed to -20°C. This will allow you to increase the lifetime of the reagent to 1 year. We recommend aliquoting the SHIELD Epoxy solution in experimentally convenient volumes upon delivery.

