
Perfusion with SHIELD Epoxy
For best results, the animal should be perfused with PBS and heparin to remove residual blood which can cause issues with autofluorescence during imaging or nonspecific antibody labeling. Then, the animal is perfused with SHIELD, SHIELD Epoxy, and 4% PFA before the organ is extracted. The sample is then incubated in more of the Perfusion Solution. In the connected SHIELD protocol (linked at the bottom) the sample will be incubated in SHIELD OFF to allow epoxy to diffuse into the sample. Finally, the epoxy will be cross-linked during the SHIELD ON step.
If you store the SHIELD Epoxy in the freezer, you will need to take it out to thaw before performing the SHIELD protocol. Alternatively you can aliquot some in advance and store it in the fridge as a shorter term storage option.
Reagents Required
- 32% Paraformaldehyde Solution (EMS): 15714-1L
- 1x PBS
- SHIELD Epoxy Solution (SH-ES) – Store at -20°C
- SHIELD Buffer Solution (SH-BS) – Store at RT
- SHIELD ON Buffer (SH-ON) – Store at 4°C
Optional for decalcification if your sample contains bone:
- Ethylenediaminetetraacetic acid (EDTA): Sigma E9884
- Sodium hydroxide (NaOH): Sigma 415413 (or any NaOH pellets)
Protocol
PERFUSION AND EXTRACTION
1. Prepare SHIELD Perfusion Solution fresh on ice using the below information. Mix the following in the order shown in the table and keep on ice. Please mix using a vortex or mix well.
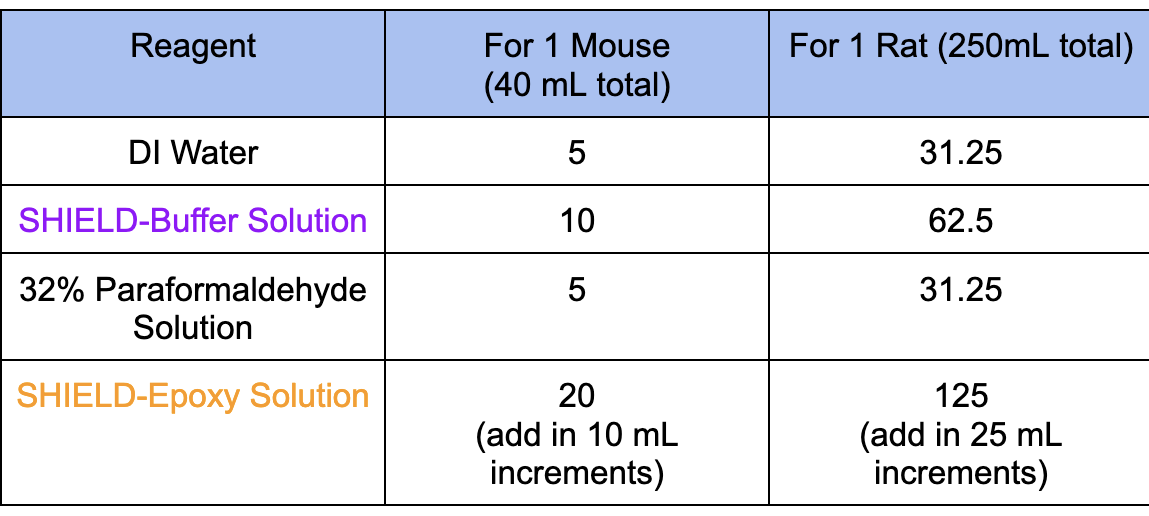
2. Transcardially perfuse the animal with ice-cold heparinized PBS (20 U/mL) followed by ice-cold SHIELD Perfusion Solution in the following volumes and flow rates. Keep the remaining SHIELD Perfusion Solution on ice for use in Step 3.

- Perfuse with heparinized PBS until the fluid is running completely clear before perfusing with SHIELD Perfusion Solution. Use the same amounts and flow rates as before.
- Be careful not to introduce air bubbles inside tubing.
- If the fluid comes out of the mouth or a lung swells, adjust the position of the needle in the heart.
- [Note] The better the perfusion, the better the results!
3. Dissect out the brain / organ of interest. Careful dissection is essential to preserve the sample’s structural integrity.
[Note] Physical damage can cause issues with potential atlas alignment during analysis, or can serve as a location to nonspecifically trap antibodies during labeling.
4. Incubate the sample in SHIELD Perfusion Solution in the amounts and durations shown in the table below at 4°C with light shaking. The volumes are optimized for brain samples, but similar volumes should be used for samples of similar size. For smaller samples, use a volume that is 10X the volume of the sample itself. Make sure the sample is immersed in the solution during shaking. Use the following volumes and incubation times:
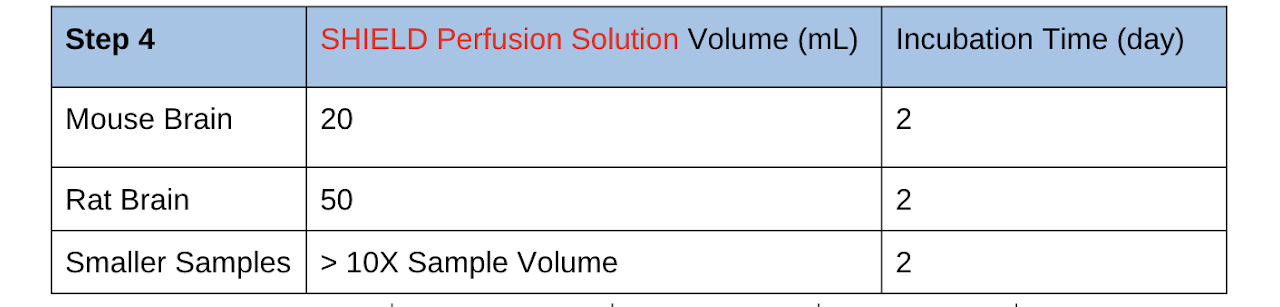
We recommend cutting the brain into hemispheres with a razor blade after this step. If your study requires an intact whole brain, you do not need to cut it.
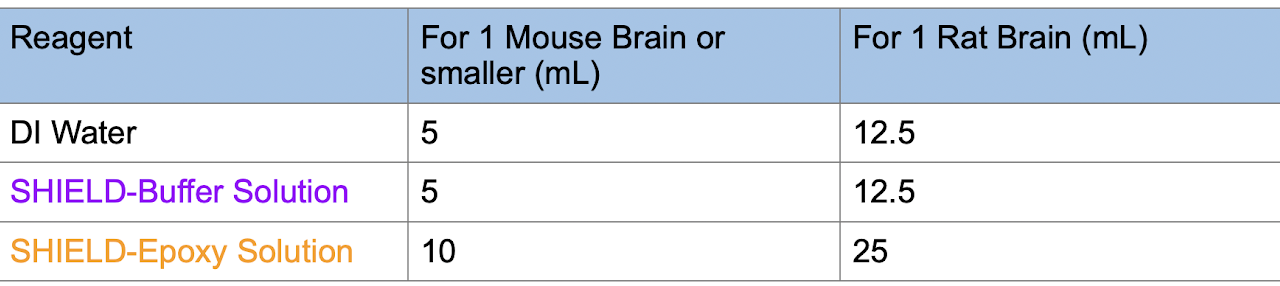
5. Prepare fresh SHIELD OFF Solution. Mix the following in the order in the table and keep on ice. After adding each reagent, please vortex or mix well to prevent precipitate formation.
6. Incubate the sample in the SHIELD OFF Solution at 4°C with shaking. Use the following volumes and incubation times:

If your sample’s smallest dimension is 1.5 mm or smaller, please stop here after incubation and continue to step 3 of Small Sample SHIELD-ON protocol.
7. Transfer the sample to SHIELD ON Buffer (RT) and incubate at 37°C with shaking. Mouse brains will require 20 mL while rat brains require 40 mL.
SHIELD preservation is now complete. The sample can be stored in 1X PBS with 0.02% sodium azide at 4°C for several months without significant loss of fluorescence signal and structural integrity.
REMOVE INTERFERING TISSUES (IF NEEDED)
This will be needed on samples such as whole mouse heads.
8. For any sample, it is best to remove skin or hair as much as possible because it does not clear very well. You can do this by shaving, cutting, or using a chemical hair remover.
9. For whole mouse heads or any samples containing bone, they will need to be decalcified. Soft tissues can skip this step!
- Prepare a solution of 10% EDTA in distilled water. EDTA’s solubility is pH dependent, so add NaOH to dissolve the EDTA and adjust to pH ~7.5.
- Incubate the sample in 10% EDTA at 4°C until the bone is soft and flexible. For a whole mouse head this takes 6 days.
You have now completed the SHIELD perfusion protocol. Continue onto delipidation here: