Active Delipidation with SmartBatch+
Reagents Required
- SmartBatch+
- Delipidation Buffer – stored at RT
- Conduction Buffer – stored at RT
- SmartBatch+ Clearing Cup
- Clearing cup membranes appear more opaque compared to SmartBatch+ Labeling Cups

Refer to the timeline above. The red dot indicates a stopping point. If you are not ready to add the samples to the device after the overnight incubation step, simply leave the samples in Delipidation Buffer until you are ready. The samples will delipidate passively in the meantime.
Protocol
Day 0
1. Incubate the samples in Delipidation Buffer for 24 hours at 45°C with light shaking.
- If you do not have a 45°C incubator then 37°C is preferable to RT.
- This step can be extended safely if needed but do not skip it.
- The buffer can be set aside and re-used for incubations until you run out of the rest of the buffer for the device.
- This can be done with 20 mL of buffer in a conical tube for each sample, or with 250 mL altogether in an Incubation Jar with a lock ring, ring stand, and mesh bags (more information here).
Day 1
2. Prepare the device for clearing.
- Wash the device and turn off Auxiliary Power.
- Drain out any liquid from the device and ensure the Drainage Valve is closed. Soak up any remaining liquid from the Chamber using a paper towel.
- Pour a whole bottle of Conduction Buffer into the Chamber.
- Leak test a Clearing Cup.
- The clearing cups have more opaque membranes than staining cups
- Fill the cup with 40 mL Delipidation Buffer.
3. Load samples and start clearing.
- Load the samples onto a Lock Ring if you have not already, and place the samples into a sample cup (more information here).
- Insert the cup in the Chamber, lining up the bottom with the Chamber Hex Piece. The cup will fit in snugly and the top of the cup will be flush with the top of the chamber.
- Turn on the Auxiliary Power.
- Close the Chamber Lid and secure it with the thumbscrew.
- Close the Case Lid.
- Press “Preset” until it indicates Clearing Mode. Change any settings or apply the timer if desired. The preset settings are the recommended settings for all tissue types (40V, 1250 mA current limit, 42°C).
- Clearing times are approximately as follows:
- Mouse brains – 30 hours
- Rat brains – 6 days refreshing Delipidation Buffer every 2-3 days
- Smaller samples can be delipidated faster, but this should be determined empirically.
- It is not required to run the shut down timer for active clearing. The brain can delipidate for longer than its estimated time without damage.
- Turn on the Electrophoresis Power.
4. Let experiment run.
Day 3
5. End the delipidation experiment after the appropriate amount of time.
- Turn off Electrophoresis Power and Auxiliary Power.
- Open the Case Lid and Chamber Lid and remove the Clearing Cup from the Chamber.
- Remove Sample Ring from the Clearing Cup and place on the Ring Stand. Carefully rinse the Clearing Cup with distilled water and store it in its storage solution.
- [Note] It is important to keep the cup membrane hydrated at all times. We recommend refreshing the storage solution every few months. Follow the recipe to make more storage solution here.
- The Conduction Buffer has a lifetime of about 10 days of electrophoresis power. This lifetime only counts if electrophoresis power is on. If the buffer has not reached the 10 day lifetime, you can drain it out, put it back in its container, and store it for later use. It is normal for the volume to drop over time as water is lost due to evaporation. This is factored into the 10 day lifetime of the buffer.
- Once the 10 days has been reached, wash the system and replace the buffer. We recommend refreshing the Delipidation Buffer when adding new samples, or every ~3 days, whichever comes first. This buffer refresh is important since the volume will drop over time due to evaporation.
- Wash and shut down the device.
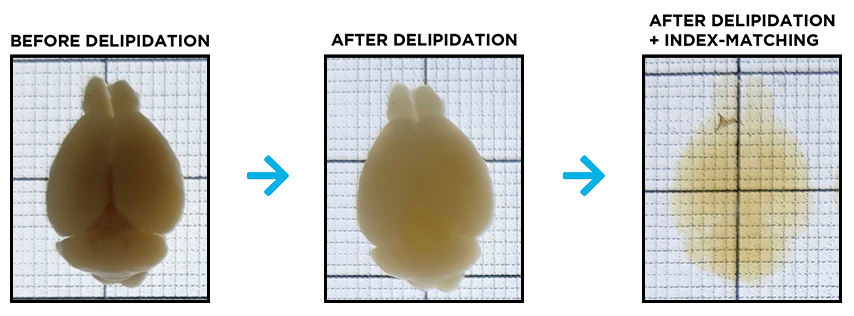
At the end of delipidation, the samples will look the same as before clearing and should not have changed size. You will not be able to tell that the sample is done clearing until the index matching stage. See images below.

[Note]: Unique Tissue Types
- If your sample is liver, we have found that an additional step will result in more transparent samples. Please follow the Liver Clearing Protocol to complete clearing of livers after Step 1 in the protocol above.
- If your sample contains significant connective tissue, adipose tissue, or skin (such as with whole mouse heads), we have found that an additional dehydrating clearing step helps clear these other tissue types without damaging fluorescent proteins. Please follow the fDisco protocol after completing Step 1 in the protocol above. Please note that this step has the potential to harm antigenicity. This step can also be moved to after immunolabeling if you find that to be the case.
6. At this point, the samples can be stored in the Incubation Jar or in individual tubes with PBS with 0.02% sodium azide at 4°C until you are ready to proceed (see timeline below). The samples can remain in their Mesh Bags if you plan to immunolabel.
You have finished Delipidation and may now move on to the next step. If your sample requires labeling, move on to that section. If no labeling is required, you can move on directly to Index Matching.
